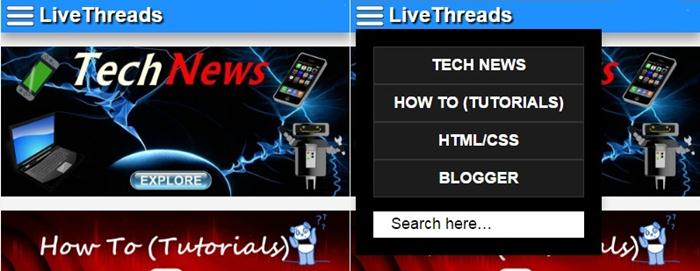
Do you want to create responsive sticky navbar with drop down menu in blogger or blogspot with help of simple html and java script? Do it now and get beautifull sticky navihation menu with submenu for blogger.
Drop down menu is a graphical control element, similar to a button, that allows user to choose one value from a list. When a drop-down button is inactive, it displays nothing. When activated or clicked, it displays (drops down) a list , from which the user may select one.
Why Use LT - Drop Down Menu In Your Site ?
- Responsive: Adjust width according to device width. Easy to use in both desktop and mobile version.
- Fast: It requires no external resources and loads very quickly.
- Theme: Adjust theme color to match your site design.
- Embedded Search: It is also embedded with search form.
- Sticky: It uses a script which shows it in top all the time even if user is scrolling.
How To Setup Sticky Drop Down Menu For Your Site ?
The codes for LT dropdown menu is divided into three parts (JS , HTML , CSS) copy and paste all codes to your site's code.
JAVASCRIPT
<script src='https://ajax.googleapis.com/ajax/libs/jquery/1.7.2/jquery.js' type='text/javascript'/>
<script type='text/javascript'>
$(function() {
var ks_widget_top = $('#sticky1').offset().top;
var ks_sticky_widgets = function(){
var ks_current_top = $(window).scrollTop();
if (ks_current_top > ks_widget_top) {
$('#sticky1').css({ 'right':0 , 'position': 'fixed','top':0, 'left':0, 'z-index':999999 });
} else {
$('#sticky1').css({ 'position': 'relative' });
}
};
ks_sticky_widgets();
$(window).scroll(function() {
ks_sticky_widgets();
});
});</script>
Note: Place above codes in between <head> and </head> in your html codes.
HTML
<div id='sticky1'>
<div class='navmob'>
<div style='display:inline; !important'><div class='ddm'><div class='dropdown'>
<button class='dropbtn' onclick='myFunction()'/>
<div class='dropdown-content' id='myDropdown'>
<a href='Url Of Categorie'>Name of categorie </a>
<a href='Url Of Categorie'>Name of categorie </a>
<a href='Url Of Categorie'>Name of categorie </a>
<a href='Url Of Categorie'>Name of categorie </a>
<br/><div id='menu-search'>
<form action='/search' method='get'>
<input name='q' onblur='if ('' === this.value) {this.value = 'Search here…';}' onfocus='if ('Search here…' === this.value) {this.value = '';}' type='text' value='Search here…'/>
</form>
</div>
</div>
</div><script>
function myFunction() {
document.getElementById("myDropdown").classList.toggle("show");
}
window.onclick = function(event) {
if (!event.target.matches('.dropbtn')) {
var dropdowns = document.getElementsByClassName("dropdown-content");
var i;
for (i = 0; i < dropdowns.length; i++) {
var openDropdown = dropdowns[i];
if (openDropdown.classList.contains('show')) {
openDropdown.classList.remove('show');
}}}}
</script><script>$("#menu-search").click(function(event){ event.stopPropagation(); });</script></div> <h1><a class='navtxt1' href='/'>Your Site Name</a></h1>
<div style='line-height:2px'><br/></div></div></div></div>
Note: Place these codes just after <body> tag in your html and change red bold text with desired values.
CSS
h1{ display:inline; !important}
h1{text-shadow:2px 2px 2px #000000;}
.dropbtn {
background:url(https://blogger.googleusercontent.com/img/b/R29vZ2xl/AVvXsEhc1oFntpHVgSPklU0KbYmXlRg38UVowuHs0dv4D0bWdY0wIxTYIPo4RpiNXQs9Hd1KDN2mHN45gUSTc1Wf_Zl5gEwhAqgICMeZZXssQOhI-Z3Rk1tfjjLlXwyoKXfqrEj5Cabi1B2QqJQR/s1600/white-menu-icon.png) no-repeat center;
padding: 16px;
border: none;
cursor: pointer;
}
.dropbtn:hover, .dropbtn:focus {
background:url(https://blogger.googleusercontent.com/img/b/R29vZ2xl/AVvXsEhc1oFntpHVgSPklU0KbYmXlRg38UVowuHs0dv4D0bWdY0wIxTYIPo4RpiNXQs9Hd1KDN2mHN45gUSTc1Wf_Zl5gEwhAqgICMeZZXssQOhI-Z3Rk1tfjjLlXwyoKXfqrEj5Cabi1B2QqJQR/s1600/white-menu-icon.png) no-repeat center;
outline:none;
}
.dropdown {
position: relative;
display: inline-block;
}
.dropdown-content {
display: none;padding: 20px 20px;
position: absolute;
background-color: #000000;
overflow: auto;
box-shadow: 0px 8px 16px 0px rgba(0,0,0,0.2);
z-index: 1;
}
.dropdown-content a {
color: #ffffff;
padding: 10px;
border: 1px solid #353535;
font-size:18px;
background-color: #1c1c1c;
text-decoration: none;
display: block;
}
.dropdown a:hover {background-color: #353535}
.show {display:block;}
.navtxt1 {
float:left;margin:2px 0px 0 5px;
color: white !important;
font-size:24px;text-decoration:none;
}
.navtxt1:hover {
text-decoration:none;
}
.ddm {
margin:0px 0px 0 5px;float:left;
}
.navmob {
border: 1px solid #ff0000;
background-color:#ff0000;
color: white !important;
box-shadow: 0 8px 16px 0 rgba(0,0,0,0.2), 0 6px 20px 0 rgba(0,0,0,0.19);
}
Note: Add above code in your stylesheet, For , blogger add these codes just above ]]>< in you html. For, wordpress add these css by customization>add css and for changing theme color change red bold values with your html color value.
Don't feel bad by looking to above drop down menu html codes, we can help you if you need any help to setup navigation menu in html edit.


